There are a few ways to get started. This article will talk about the most common ways and how to optimize images for the web.
Type Photopea.com into your browser. This is a free online version of Photoshop.

There are a few ways to get started. This article will talk about the most common ways and how to optimize images for the web.
Type Photopea.com into your browser. This is a free online version of Photoshop.

Method 1 – Drag & Drop:
Let’s say you have an image you took with your own camera, just drag it from your desktop directly into the Photopea browser. Alternatively, you can go to the menu and click File > Open. This will allow you to find an image on your computer to place into the program.
The next step is to resize the image. There is an infinite amount of sizes but websites are containers built with structure. You will need to choose a size that has the proper dimensions for your website. Headers, page breaks and sliders use the largest images. Image Galleries and Products often have smaller cropped photos.
Method 1 – Drag & Drop:
Let’s say you have an image you took with your own camera, just drag it from your desktop directly into the Photopea browser. Alternatively, you can go to the menu and click File > Open. This will allow you to find an image on your computer to place into the program.
The next step is to resize the image. There is an infinite amount of sizes but websites are containers built with structure. You will need to choose a size that has the proper dimensions for your website. Headers, page breaks and sliders use the largest images. Image Galleries and Products often have smaller cropped photos.
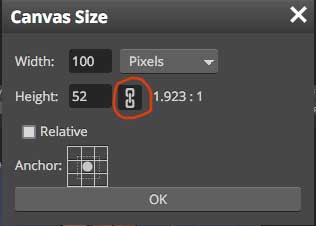
To resize an image go to the menu and click Image > Canvas Size. Then click the little Link icon below the pixels drop down.
Once the Link Icon is clicked you can enter any custom size into the Width section and the Height will automatically adjust to the correct proportions. To make this happen just click anywhere outside of the number box or press the tab button on your keyboard.
If the link icon isn’t selected you may accidentally stretch an image and that creates a very unprofessional look.
Common Sizes to use:

You can also use the Crop Tool and manually drag the corners of an image. This is useful when trimming the edges of a photo that is either to large or to small to fit in a preset.
*Note When you save the image you will still need to choose a size below 1000 px for most things.
Also if your saving multiple photos for an image gallery or for your online store try and stick with the same image sizes. You don’t want to jump from portrait to landscape in the same gallery. It often looks strange on a website and in some cases people mistake it as a broken page section.
But you can have two different galleries where one is portrait and the other is landscape.
Need help finding an image size? Use The Image Measurement Calculator
Photos are measured in pixels vs inches. 1000 pixels is 10 inches. This is huge on the web. But most websites these days require high quality photography. When using a mobile device such as a phone or a tablet images are scaled to fit the display. Having a quality image will eliminate pixelation. (blurry/ grainy around edges of a photo) That was a common issue caused by older cameras. Most phones after 2017 have the ability to take a photo in 4k.
Click Here for a good Inch to Pixel Converter.
Using Proper Image Extension:
When working with websites it’s important to optimize all your photos to keep file sizes down. This will boost performance by speeding up the website’s loading times. In order to do this in Photopea your first step is to determine what kind of file it is your saving for the web. A jpg is a lossy compression for digital images. This is the most common file type, a png file has a transparent background (good for logos) and a PDF is great for keeping a master copy of your design without quality loss.
Keep in mind Photopea is a pixel-based program like Photoshop. PDF files won’t be in vector format. If you upscale a project outside of the dimensions it was built in there will be some pixilation.
*Very Important: Give your image a good name. Images are invisible to the web. Search engines only know what images are based on good descriptions. Proper naming helps with your site SEO. (Search Engine Optmization) Be specific, if it’s a car the title should be the Model, Make, Color, and Year.
Your most common image type is jpg. To save an image go to File > Export as > jpg.
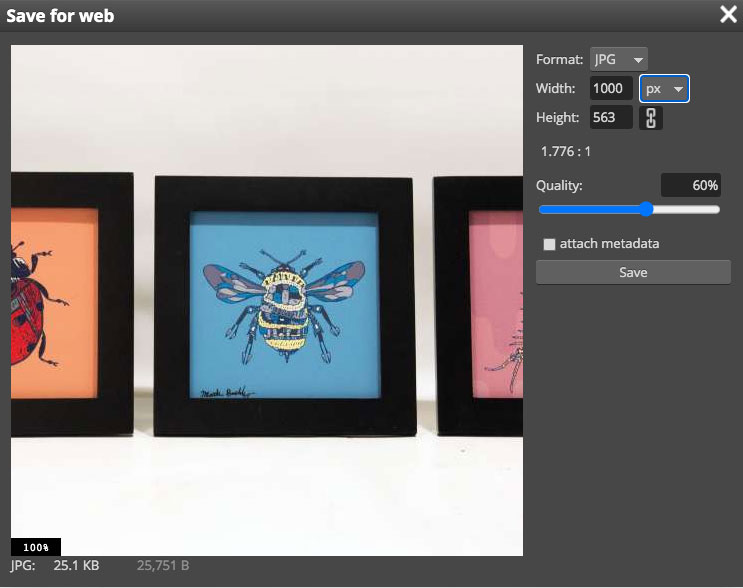
Image Optimization
The next step is to adjust the Quality slider. Set the quality slider to 60% (60% is the lowest setting before a noticeable quality loss.) On occasion images over 2000 pixels can be scaled down further.
Now click the save button. The image should go to your downloads folder on your computer. Windows users may have a different preset folder.
Method 2 – Creating A New Project:
Let’s say you want to create a new project from scratch. Once you see Photopea in your browser go to File > New. This will open a new project window where you can pick your image dimensions.
The first field displayed is Project Name. This is where you give your project a custom name. Below that is a field called Width, Height, and DPI. If you don’t know how large to make your project start with the default tab options. The Screen Tab is designed for a website header/banners. The social tab is used for social media posts and the 2nd tab is used for square images. (if you go with the 2nd tab try to stay at 1024 x 1024 px or smaller) The other tabs are for Print related projects and mobile displays.
